The best TV technology isn’t OLED or QLED; it’s the one that perfectly matches your room’s lighting and your personal viewing habits.
- Your room’s brightness is the deciding factor. A simple smartphone app can tell you if your room needs QLED’s power or can benefit from OLED’s subtlety.
- OLED’s infamous burn-in risk is practically zero for most people watching varied content, but a real concern if you watch channels with static logos for hours daily.
Recommendation: Stop comparing abstract specifications in a showroom and start diagnosing your home environment to make a truly informed choice.
For the UK home cinema enthusiast, the choice between OLED and QLED technology can feel like an impossible puzzle. You stand in a brightly lit showroom, bombarded by dazzling displays and marketing claims promising the ultimate viewing experience. One screen boasts “perfect blacks” and infinite contrast, while its neighbour counters with searing brightness and vibrant, punchy colours. The conventional wisdom is simple: OLED for movie purists in dark rooms, QLED for everyone else. But this oversimplification is the very reason many buyers end up with a television that is fundamentally mismatched for their home.
The truth is, the most critical factor in your decision isn’t a technical specification on a label, but the unique environment of your own living room. The amount of ambient light, your family’s viewing habits, and even the type of games you play are far more telling than any showroom demonstration. This guide will move beyond the marketing jargon. We will not simply list pros and cons; instead, we will equip you with a diagnostic framework to analyse your specific needs. Forget the platitudes. The key isn’t to find the “best” television, but to identify the right technology that will perform at its best in your actual viewing space, for your real-world use.
This article provides a structured approach to making your choice. We will explore the real-world implications of each technology, from long-term performance to how it integrates with your existing audio equipment, empowering you to make a decision as an informed expert of your own home cinema.
Summary: OLED Perfect Blacks or QLED Brightness: Which Technology for Your Viewing Room?
- Why Does Your Viewing Habit Determine Whether OLED Burn-In Should Worry You?
- How to Test Whether Your Living Room Suits OLED or Needs QLED Brightness?
- OLED Dimming After 5 Years or QLED Stability for 10:How Narrow Can Your Niche Be Before Losing 90% of Potential Viewers?
- The Showroom Comparison That Led to Wrong Technology Choice at Home
- 120Hz QLED for Gaming or Cinematic OLED for Films: Which Fits Your Use?
- How to Test Whether Your Soundbar Is Downgrading 4K HDR to Standard Range?
- How Much Amplifier Power for a 4m × 5m UK Living Room Versus Home Cinema?
- How Can UK Beginners Set Up 7.1 Surround Without £800 Installation Fees?
Why Does Your Viewing Habit Determine Whether OLED Burn-In Should Worry You?
The fear of “burn-in” or permanent image retention is perhaps the biggest ghost haunting the OLED narrative. The concern is that static elements—like a news channel’s ticker, a video game’s heads-up display (HUD), or a computer’s taskbar—can permanently “burn” a faint outline onto the screen. This happens because OLEDs use organic compounds that degrade over time, and if one set of pixels is constantly displaying a bright, static image, it will age faster than the pixels around it, creating a visible discrepancy. However, for the vast majority of viewers, this fear is largely misplaced.
The key determinant of risk is not whether you own an OLED, but how you use it. If your viewing consists of a wide variety of content—switching between films, different TV shows, and streaming services—the wear on pixels is distributed evenly. In fact, comprehensive display testing data shows near-zero burn-in risk for users with up to 3-4 hours of daily viewing on varied content. The risk becomes significant only under very specific, and often extreme, usage patterns, such as using the TV as a digital sign or watching the same 24-hour news channel with its static logos for eight hours a day, every day.
Modern OLED manufacturers are acutely aware of this potential issue and have engineered a suite of sophisticated protection mechanisms to mitigate it. These technologies work silently in the background to ensure the longevity of your panel. Before dismissing OLED technology out of fear, it is crucial to understand the protections that are already in place, making burn-in a non-issue for the typical home user.
Your Action Plan: Verify Your TV’s Anti-Burn-In Features
- Pixel Shift: Verify the TV periodically moves the entire image by a few pixels in random directions. This is invisible during viewing but prevents any single pixel from rendering the same colour at the same brightness indefinitely.
- Logo Luminance Adjustment: Confirm the TV automatically reduces brightness on static bright areas, like channel logos or on-screen graphics, when they are detected.
- Automatic Screen Saver: Check that the screen dims itself or activates a screensaver after a few minutes of detecting a static image (like a paused movie).
- Thermal Modulation System: Ensure algorithms automatically control brightness and prevent overheating during extended high-brightness usage, which can accelerate pixel aging.
- Panel Refresh Cycles: Verify the TV runs automatic compensation cycles during standby to recalibrate pixel luminance and prevent uneven aging across the screen.
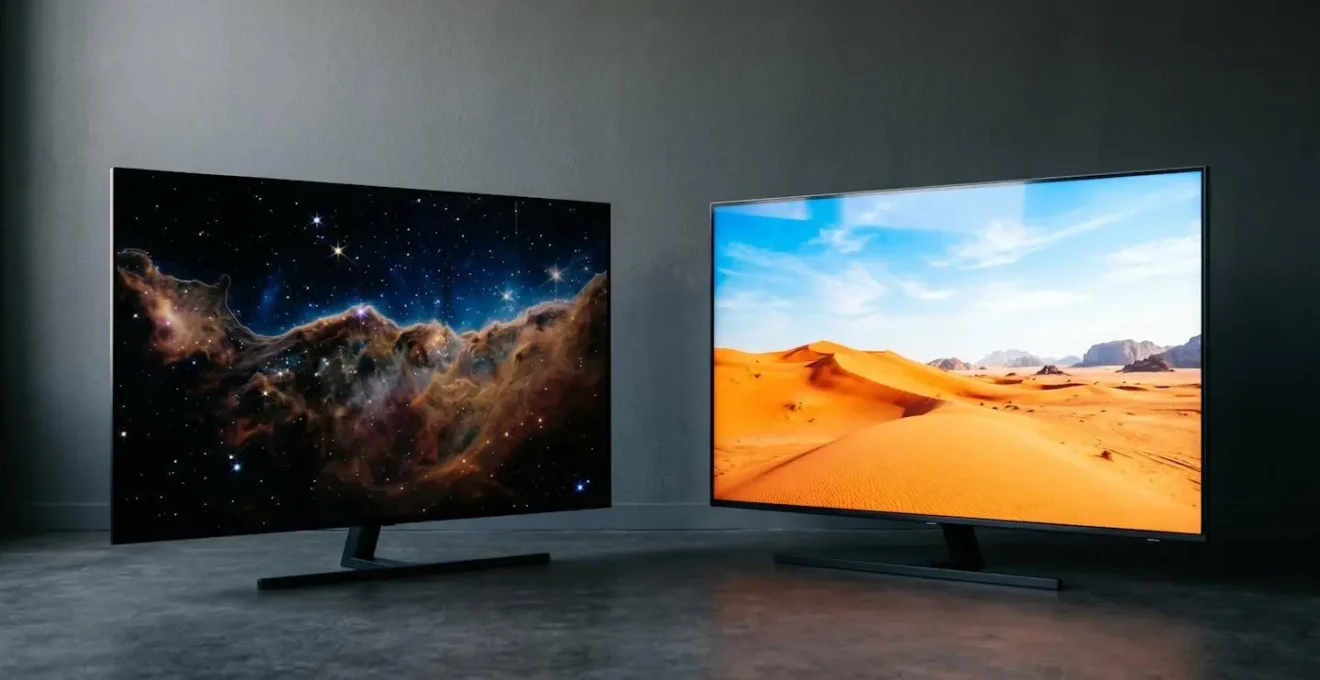
How to Test Whether Your Living Room Suits OLED or Needs QLED Brightness?
The single most important, yet most often ignored, factor in the OLED vs. QLED debate is the ambient light in your viewing room. An OLED TV’s ability to achieve perfect black by turning individual pixels completely off creates an unparalleled contrast ratio that is breathtaking in a dark or dimly lit environment. However, that same subtle, nuanced picture can appear washed out and reflective in a bright, sun-drenched living room. This is where QLED (and its variants like Mini-LED) shines, using a powerful backlight to push through ambient light and deliver a vibrant, impactful image even during the day.
Instead of guessing, you can perform a simple, objective test using a tool you already own: your smartphone. By measuring the actual light levels in your room, you can remove marketing from the equation and make a data-driven decision. This diagnostic approach transforms you from a passive consumer into an informed analyst of your own space. The goal is to quantify your environment to see which technology is engineered to perform best within it.
The image above illustrates a typical UK living room with a large side window, a common scenario where ambient light drastically changes throughout the day. The following test will determine if this room is an OLED paradise or a space that demands QLED’s brightness.
Your Action Plan: The Smartphone Lux Meter Test
- Step 1: Download a free light meter app (such as Lux Light Meter for Android or a similar app for iOS) on your smartphone.
- Step 2: Position your phone at the exact location where the TV screen will be, with the front camera/sensor facing your primary seating area to measure the light hitting the screen.
- Step 3: Measure ambient light levels at three different times you typically watch TV: mid-morning (e.g., 10 AM), afternoon (e.g., 3 PM), and evening with your usual room lighting (e.g., 8 PM).
- Step 4: Record the lux readings for each time period. Note the highest reading during your typical viewing hours.
- Step 5: Apply the decision criteria: If your average or peak viewing time reading is consistently below 100-150 lux, your room is an ideal OLED environment. If it’s often between 150-500 lux, both technologies can work, but QLED will have an edge in daytime. If your readings frequently exceed 500 lux, a high-brightness QLED is strongly recommended to combat the ambient light and deliver a satisfying HDR experience.
OLED Dimming After 5 Years or QLED Stability for 10:How Narrow Can Your Niche Be Before Losing 90% of Potential Viewers?
Beyond the immediate concerns of burn-in, a more nuanced long-term consideration is the gradual aging of the display technology. Both OLED and QLED panels have a finite lifespan, but they degrade in different ways. Understanding this long-term performance is crucial for an enthusiast investing in a premium television. The choice is often between the initial peak performance of OLED and the sustained brightness of QLED over a longer period.
OLED panels, being self-emissive, experience a gradual decrease in luminance over their operational life. The technical definition of an OLED’s lifespan is the time it takes for its brightness to fall to 50% of its initial level. While this sounds dramatic, the numbers are reassuring for typical use.
Case Study: OLED Lifespan in Real-World Scenarios
An in-depth analysis of OLED material degradation shows that modern television OLEDs have a projected lifespan of around 100,000 hours. For a user watching TV for 8 hours a day, this translates to over 34 years before the panel reaches half its original brightness. The study notes that the blue OLED subpixels degrade the fastest due to their higher energy requirements, which can lead to a subtle colour shift over many thousands of hours of use, but this effect is minimal in the first decade of typical home viewing.
In contrast, QLED technology is exceptionally stable. Since it uses inorganic Quantum Dot crystals and a separate LED backlight, it is not prone to the same organic degradation as OLED. The LED backlight is typically the component that will fail or dim first, but modern LED backlights are rated for 60,000 to 100,000 hours of use, ensuring consistent brightness and colour performance for well over a decade. For a user who values long-term consistency and wants their TV to look as bright and vibrant in year ten as it did in year one, the stability of QLED technology presents a compelling argument.
The Showroom Comparison That Led to Wrong Technology Choice at Home
One of the most common pitfalls in buying a new television is what can be called the “Showroom Fallacy.” Retail environments are, by design, worst-case scenarios for television viewing: they are cavernously large, filled with competing light sources, and flooded with harsh, overhead fluorescent lighting. In this specific, artificial environment, one technology has a distinct and often misleading advantage.
A TV that looks spectacular under these conditions might be overpowering or unnatural in a typical, more dimly lit UK living room. The technology that “wins” the showroom battle is the one engineered to be the brightest and most saturated, which isn’t always the one that provides the most accurate or cinematic experience at home. This is why making a decision based purely on a side-by-side comparison in a store so often leads to buyer’s remorse.
The team at Smart Home Sounds succinctly explains the design philosophy that gives QLED an edge in these bright environments, which directly translates to its showroom appeal. As their technology editors note, this is a feature, not a flaw, but it must be matched to the correct environment.
QLED TVs are designed to make the image brighter, more vibrant with strong colour performance, particularly at higher brightness levels. This makes QLED especially effective for HDR content and bright living rooms where extra luminance can make a noticeable difference.
– Smart Home Sounds Technology Editorial Team, QLED vs OLED: The Differences That Actually Matter
This is the core of the showroom fallacy: QLED’s strength in high brightness is on full display, while OLED’s key advantage—its perfect black levels and subtle shadow detail—is completely lost in a bright room. You cannot perceive the absence of light (perfect black) when your eyes are being blasted by ambient light from all directions. Therefore, the showroom test is biased and incomplete; the real test happens in your own home.
120Hz QLED for Gaming or Cinematic OLED for Films: Which Fits Your Use?
Beyond the fundamental differences in brightness and black levels, the specific use case—primarily cinematic film viewing versus competitive gaming—introduces another layer of nuance. While the platitude “OLED for films, QLED for games” holds a kernel of truth, the reality is far more detailed. Both technologies now offer features that cater to both camps, and the right choice depends on what specific performance aspect you prioritise.
For gamers, metrics like pixel response time, input lag, and refresh rate are paramount. A fast response time reduces motion blur, making fast-moving objects clearer, which is a huge advantage in competitive shooters or racing games. For film enthusiasts, however, black level performance, colour accuracy, and the ability to render subtle shadow detail are far more important for a truly immersive, cinematic experience.
The following table breaks down the key performance differences, moving beyond simple generalisations. As an analysis from industry experts shows, the best choice depends entirely on which column of benefits aligns most closely with your primary use. For example, a horror game enthusiast might prioritise OLED’s perfect blacks for atmosphere, while an MMO player might prefer QLED’s immunity to burn-in from static on-screen menus. The data from a detailed comparison of gaming metrics provides a clear framework for this decision.
| Performance Metric | OLED Technology | QLED Technology | Gaming Impact |
|---|---|---|---|
| Pixel Response Time | 0.1-0.2 milliseconds | 2-10 milliseconds | OLED provides significantly less motion blur and ghosting in fast-paced scenes |
| Refresh Rate Support | 120Hz-144Hz common | 120Hz-144Hz common | Both technologies support high refresh rates equally |
| Black Level Performance | Perfect blacks (0 nits) | Elevated blacks (0.02-0.05 nits) | OLED excels in dark gaming environments (horror, atmospheric RPGs) |
| Peak Brightness HDR | 700-1000 nits | 1500-2000+ nits | QLED superior for bright open-world games and HDR highlights in well-lit rooms |
| Input Lag (Game Mode) | ~10ms average | ~10-15ms average | Both offer competitive-grade responsiveness |
| Burn-In Risk (Static HUD) | Moderate with prolonged static elements | Negligible to none | QLED safer for games with persistent UI elements (MMOs, competitive shooters) |
How to Test Whether Your Soundbar Is Downgrading 4K HDR to Standard Range?
You’ve meticulously chosen the perfect television for your room and habits. You connect your 4K Blu-ray player or games console through your premium soundbar, ready for a sublime audio-visual experience. Yet, the image seems to lack the punch and vibrancy you expected. The culprit may not be your TV, but a bottleneck in your signal chain: your soundbar might be “downgrading” your 4K HDR video signal to a standard dynamic range (SDR) feed.
This issue arises when a soundbar, especially an older model, doesn’t have the necessary bandwidth or certification (like HDCP 2.2) for 4K HDR “passthrough.” It receives the full-quality signal from your source device, extracts the audio, but then passes on a compromised video signal to the TV. The solution is often to connect your source directly to the TV and send audio back to the soundbar using the HDMI eARC (Enhanced Audio Return Channel) port. Enhanced Audio Return Channel (eARC) is a critical feature because, according to Samsung’s technical specifications, it allows the transmission of uncompressed, original-resolution audio formats like Dolby Atmos from the TV to the soundbar. This ensures you get the best possible picture and sound without compromise.
Verifying your signal integrity is a straightforward process that you can do from your sofa. Follow these steps to ensure you’re getting the full 4K HDR quality you paid for.
- Step 1: Identify the eARC/ARC port on your TV (usually labeled ‘HDMI eARC’) and the corresponding port on your soundbar.
- Step 2: Ensure you are using an ‘Ultra High Speed’ HDMI cable (certified for HDMI 2.1) for the TV-to-soundbar connection to handle the required bandwidth.
- Step 3: In your TV’s audio settings, ensure that ‘HDMI eARC Mode’ is enabled or set to ‘Auto’.
- Step 4: For maximum video quality, connect your high-end source device (e.g., PS5, Apple TV 4K) directly to another HDMI 2.1 port on your TV, not through the soundbar.
- Step 5: While playing 4K HDR content, access your TV’s signal information display (this varies by brand, but often involves pressing an ‘Info’ or ‘Display’ button on the remote) to confirm the input is recognized as ‘4K HDR’ or ‘Dolby Vision’.
- Step 6: If the signal shows ‘4K SDR’ or just ‘4K’, your soundbar’s passthrough is likely the issue. Re-check your connections and settings, ensuring the eARC configuration is correct.
How Much Amplifier Power for a 4m × 5m UK Living Room Versus Home Cinema?
The choice between OLED and QLED can even have subtle implications for your audio system. While not a direct technical link, the characteristics of the visual experience you choose can influence the type of audio that best complements it. The question of amplifier power isn’t just about loudness; it’s about control, nuance, and dynamic range—the ability to render the quietest whisper and the loudest explosion with equal clarity.
For a standard 4m × 5m UK living room, a modest AV receiver or a high-quality soundbar with 50-100 watts per channel is more than sufficient for an impactful experience. However, the choice of display can shift the priority. A bright, punchy QLED is fantastic for daytime sports or vibrant animated films, where a powerful, energetic soundstage from a soundbar or compact system feels right at home. The audio needs to have the presence to match the visually dynamic image.
Conversely, the deep, cinematic quality of an OLED display, which excels in creating atmosphere and revealing subtle details in dark scenes, arguably calls for an audio system with similar capabilities. This is where the justification for a more powerful, capable amplifier comes in, even in the same 4m x 5m room.
An OLED’s deep blacks and subtle shadows demand an audio system capable of similar nuance and dynamic range, potentially justifying a more powerful amplifier to handle quiet whispers and loud explosions without distortion.
– Home Cinema Configuration Principles, Visual Display Technology Impact on Audio System Requirements
A more powerful amplifier isn’t just for playing things louder. It provides “headroom,” meaning it can deliver sudden, high-impact sounds without clipping or distortion, preserving the dynamic range of a film’s soundtrack. For an OLED owner who has invested in perfect blacks to savour every detail of a dark, atmospheric thriller, pairing it with an audio system that can render the subtle creak of a floorboard with the same fidelity as a sudden gunshot completes the immersive experience.
Key Takeaways
- Your room’s ambient light, measurable with a smartphone, is the single most important factor in the OLED vs. QLED choice.
- OLED burn-in risk is determined by your specific viewing habits (static vs. varied content), not a general flaw in the technology.
- A true home cinema experience requires ensuring your entire signal chain, including the soundbar, supports 4K HDR passthrough to avoid downgrading video quality.
How Can UK Beginners Set Up 7.1 Surround Without £800 Installation Fees?
Building a true 7.1 surround sound system can seem daunting for a beginner, with the prospect of complex wiring and professional installation fees that can easily reach £800 or more in the UK. However, modern TVs and audio systems have democratised the process, offering sophisticated tools that allow enthusiasts to achieve 80% of a professional-grade calibration without any specialist help. The key lies in leveraging the automated room correction systems built into most new OLED and QLED TVs and AV receivers.
Systems like LG’s ‘AI Sound Pro’, Samsung’s ‘SpaceFit Sound’, and Sony’s ‘Acoustic Auto Calibration’, along with receiver-based systems like Audyssey and YPAO, use a small microphone to analyse your room’s unique acoustics. They automatically adjust speaker levels, distances, and equalization to compensate for room shape, furniture, and speaker placement, a task that once required expensive professional equipment. This technology makes a DIY setup not only possible but highly effective.
By combining this automated technology with some basic placement principles and the option of wireless rear speakers, you can build an immersive 7.1 system over a weekend, saving a significant amount on installation costs.
- Step 1: Confirm your TV and/or AV receiver has a built-in microphone-assisted room calibration system. This is your most powerful tool.
- Step 2: Place the calibration microphone at your main listening position, at ear height, and run the automated setup process in a quiet room.
- Step 3: For initial speaker placement, use the Dolby guidelines as a starting point: front speakers at a 45-60 degree angle, side surrounds at 90-110 degrees, and rear surrounds at 135-150 degrees relative to your central seat.
- Step 4: To avoid complex wiring, consider investing in a system with wireless surround speakers. Brands like Samsung, Sonos, and others with WiSA certification offer excellent options that eliminate the need to run cables across the room.
- Step 5: After finalising your speaker positions, re-run the automatic calibration. This final step will fine-tune the system to its new configuration, optimising performance for your exact setup.
Armed with this diagnostic approach, you are now equipped to re-evaluate television models not by their marketing claims, but by how well their inherent strengths align with your unique home profile and viewing philosophy. The perfect TV for you is out there, and you now have the tools to find it.