The thought of configuring a 7.1 surround sound system, with its complex AV receiver and tangle of wires, is enough to make many UK home cinema enthusiasts consider paying steep professional installation fees. However, achieving immersive, cinema-quality audio is less about spending a fortune and more about understanding a few core principles. By focusing on strategic speaker placement over expensive gear, ensuring your signal path is correctly configured for 4K HDR, and making smart upgrade decisions, you can build a system that rivals professional setups yourself and save hundreds of pounds in the process.
Building a true 7.1 surround sound system in your home feels like a pinnacle achievement for any film or gaming enthusiast. The promise is an immersive audio bubble that transports you directly into the action. Yet, for many in the UK, this dream quickly collides with a daunting reality: a complex AV receiver blinking with cryptic acronyms, seven speakers to place in a typically-sized living room, and the looming threat of professional installation quotes that can easily run from £1,000 to over £15,000 for high-end projects.
The common advice is often to simply “buy the best you can afford” and “run the auto-calibration”. This oversimplification is what leaves many beginners feeling frustrated, with expensive equipment that sounds underwhelming. The intimidation factor is real, pushing many towards costly professional help or, worse, abandoning the 7.1 dream for a simpler soundbar. But what if the secret wasn’t in the budget, but in the knowledge? What if understanding the *why* behind the setup process could empower you to make smarter, more effective choices than simply throwing money at the problem?
This guide demystifies the process. We will break down the crucial decisions you face, from speaker placement and amplifier power to HDMI ports and upgrade paths. Instead of just showing you a perfect diagram, we’ll explain the strategic compromises needed for real-world UK rooms. Our goal is to give you the confidence and the know-how to build a stunning 7.1 system yourself, ensuring every pound you’ve spent on equipment is audible in the final result.
This article provides a clear roadmap for your DIY setup. Below is a summary of the key areas we will cover to help you build your system with confidence and avoid unnecessary costs.
Summary: Your Guide to DIY 7.1 Surround Sound
- Why Does Audyssey Calibration Improve Sound More Than Speaker Repositioning?
- How Much Amplifier Power for a 4m × 5m UK Living Room Versus Home Cinema?
- How Many HDMI Inputs Before You Regret Saving £100 on Fewer Ports?
- The HDMI Port Choice That Downgrades Your 4K Content to 1080p
- Should You Replace Your 5-Year Receiver or Upgrade Your Budget Speakers First?
- Why Do £300 Speakers Properly Placed Beat £1K Speakers in Wrong Positions?
- How to Test Whether Your Soundbar Is Downgrading 4K HDR to Standard Range?
- How Can Small UK Living Rooms Deliver Cinema-Level Immersion on 4m Walls?
Why Does Audyssey Calibration Improve Sound More Than Speaker Repositioning?
This is a trick question. It doesn’t. Automated room calibration systems like Audyssey, Dirac Live, or Yamaha’s YPAO are incredibly powerful tools, but they are designed to be the final polish, not the foundation. They work by sending test tones to each speaker and using a microphone to measure how your room’s acoustics colour the sound. The system then creates a digital (EQ) filter to counteract negative effects like boomy bass or harsh high frequencies caused by reflections. Think of it as a highly sophisticated tone control that’s tailored to your specific room and speakers.
However, no amount of digital correction can fix fundamentally poor speaker placement. As the expert calibration team at Nintronics UK notes, “Speaker, subwoofer and seating placement are crucial for achieving smooth bass response, an enveloping soundstage and clean, natural panning”. If your speakers are too close to walls, buried in a cabinet, or aimed incorrectly, the sound that reaches the microphone is already compromised. The calibration system might make it sound *better*, but it’s correcting a flawed signal. It’s like using Photoshop to fix a blurry photo – you can sharpen it, but you can’t restore the detail that was never captured.
The correct approach is to treat placement as 90% of the battle. Spend your time getting the speaker positions as close to ideal as your room allows *first*. Then, run the Audyssey calibration. This allows the software to work on an already good-sounding system, applying subtle refinements to elevate it to greatness rather than performing major surgery on a problem patient. This philosophy—getting the physical setup right before relying on digital fixes—is the single biggest step towards achieving professional-level sound on a DIY budget.
How Much Amplifier Power for a 4m × 5m UK Living Room Versus Home Cinema?
The question of “how many watts?” is one of the most common, and most misunderstood, in home cinema. The answer isn’t simply “more is better.” The required power depends on a trio of factors: your room size, your speaker’s sensitivity, and how loud you realistically listen. For a typical UK living room, the considerations are very different from a dedicated, soundproofed home cinema. Manufacturers often use high wattage figures as a marketing tool, but the reality is more nuanced.
A speaker’s sensitivity rating (measured in dB) tells you how loud it will play with just one watt of power, measured from one metre away. Most home speakers have a sensitivity of typically around 85 dB SPL/W/m. To get twice as loud, you need ten times the power. This means the difference between a 50-watt and 100-watt receiver is audible, but not a doubling of volume. For most small to medium UK living rooms, where listening distances are short and you have neighbours to consider, a receiver rated for 50-80 watts per channel is more than sufficient to achieve thrilling cinema volumes without being pushed to its limits.
Overpowering a small room can actually be detrimental, as it can lead to a compressed sound and you’ll barely be turning the volume dial. The key is to match the amplifier to the space. In a larger, dedicated space like a loft conversion, more power (100-150 watts) becomes beneficial to fill the room and provide effortless dynamics. The goal is not just loudness, but headroom—the ability for the amp to deliver sudden bursts of power for explosions or musical crescendos without distortion.
This table, based on data from a detailed speaker wattage calculator, provides a practical guide for UK room types.
| Room Type | Room Size | Recommended Power per Channel | Reasoning |
|---|---|---|---|
| Small UK Living Room | 4m × 5m (20m²) | 50-80 watts | Close listening distance, neighbour consideration in terraced/semi-detached homes |
| Medium Living Room | 5m × 6m (30m²) | 80-100 watts | Balanced power for dual-purpose spaces |
| Dedicated Loft Cinema | 6m × 7m (42m²) | 100-150 watts | Better isolation allows reference-level volumes |
How Many HDMI Inputs Before You Regret Saving £100 on Fewer Ports?
When choosing an AV receiver, it’s easy to focus on power ratings and sound formats, but one of the most critical long-term considerations is the number of HDMI inputs. Manufacturers often differentiate their models by port count, and saving £100 by opting for a model with four inputs instead of six can seem like a smart move. This is almost always a false economy, especially in a modern UK household where source devices multiply rapidly.
Consider a typical, non-extravagant UK setup. You will likely have:
- A Sky Q or Sky Glass box
- A primary games console like a PlayStation 5 or Xbox Series X
- A secondary console like a Nintendo Switch
- A 4K Blu-ray player for the best possible picture quality
- A streaming device like an Apple TV 4K or Amazon Fire TV Stick 4K Max
This list alone accounts for five HDMI inputs. If you have a Virgin Media box instead of Sky, or own both next-gen consoles, you’re already at six ports. Saving that initial £100 suddenly means you’re already out of room and will have to start plugging and unplugging cables, completely defeating the convenience an AV receiver is meant to provide.
The common retort is “I’ll just buy an HDMI switch.” While technically a solution, it’s a poor compromise. A quality, reliable HDMI 2.1 switch that won’t compromise your 4K 120Hz or HDR signal costs between £40 and £60 on Amazon UK. This immediately erodes up to 60% of your initial saving. More importantly, it introduces another device, another remote, another power outlet, and another potential point of failure in the complex “HDMI handshake” process. For the sake of a £40 saving, you’ve added clutter and unreliability. Given that most people keep their AV receiver for 5-7 years, investing in at least six, and ideally eight, HDMI inputs is one of the smartest future-proofing decisions you can make.
The HDMI Port Choice That Downgrades Your 4K Content to 1080p
You’ve meticulously chosen your 4K TV, bought a 4K Blu-ray player, and subscribe to the 4K tier on Netflix. Yet, without realising it, you could be watching everything in glorious 1080p HD. This frustrating scenario often boils down to a single, easily overlooked detail: the specific HDMI port you’ve used on your AV receiver. Not all HDMI ports are created equal, and choosing the wrong one can create a signal integrity bottleneck that downgrades your picture quality.
On many modern AV receivers, especially mid-range models, only a subset of the HDMI inputs might support the full 4K HDR (High Dynamic Range) or 4K@120Hz signal required by devices like a PS5 or Xbox Series X. The other ports might be older HDMI 2.0 or even 1.4 standards, which are limited to 4K at lower refresh rates or can’t pass HDR information. Plugging your high-spec source into a low-spec port forces the system to “down-negotiate” to the lowest common denominator, which is often 1080p SDR (Standard Dynamic Range).
Manufacturers usually label the high-bandwidth ports, sometimes marked “4K”, “HDCP 2.2/2.3”, or with a specific gaming icon. It is absolutely critical to identify these ports and reserve them for your highest-quality sources. Your PS5, Xbox Series X, and 4K Blu-ray player should always occupy these premium slots. Less demanding sources like a Nintendo Switch or an older Sky box can be connected to the standard ports. Getting this right costs nothing but a few minutes of attention and ensures you’re actually seeing the pristine 4K HDR picture you’ve paid for.
Should You Replace Your 5-Year Receiver or Upgrade Your Budget Speakers First?
This is a classic home cinema dilemma. Your system feels a bit dated, and you have a budget for one major upgrade. Do you replace the electronic heart of your system, the AV receiver, or do you upgrade the components that actually make the sound, the speakers? For most people, the answer is surprisingly clear: upgrade the speakers first. Speaker technology evolves at a much slower pace than video and connectivity standards. A good set of speakers from five years ago is still a good set of speakers today. The same cannot be said for an AV receiver.
The decision hinges on identifying the “bottleneck” in your system. Is your current receiver preventing you from accessing features you want *right now*? A five-year-old receiver likely lacks support for Dolby Atmos/DTS:X height channels and, more critically, the HDMI 2.1 features needed for 4K@120Hz gaming on a PS5 or Xbox Series X. If you are a serious gamer with a 120Hz TV, or you are ready to install ceiling speakers, then the receiver is your bottleneck and must be replaced. For everyone else, your current receiver is probably perfectly capable.
Upgrading from budget speakers to a quality mid-range set will provide a far more dramatic and immediate improvement in sound quality than any receiver swap. The UK second-hand market offers phenomenal value here. A £1,200 pair of KEF or Monitor Audio speakers from 2019 can often be found for £500-£700 on platforms like AVForums Classifieds. This delivers a transformative audio upgrade. Contrast this with spending £700 on a new receiver that offers features you may not use, while still playing them through the same limiting budget speakers. Unless your receiver is functionally obsolete for your specific needs, always invest in better transducers (the speakers) first.
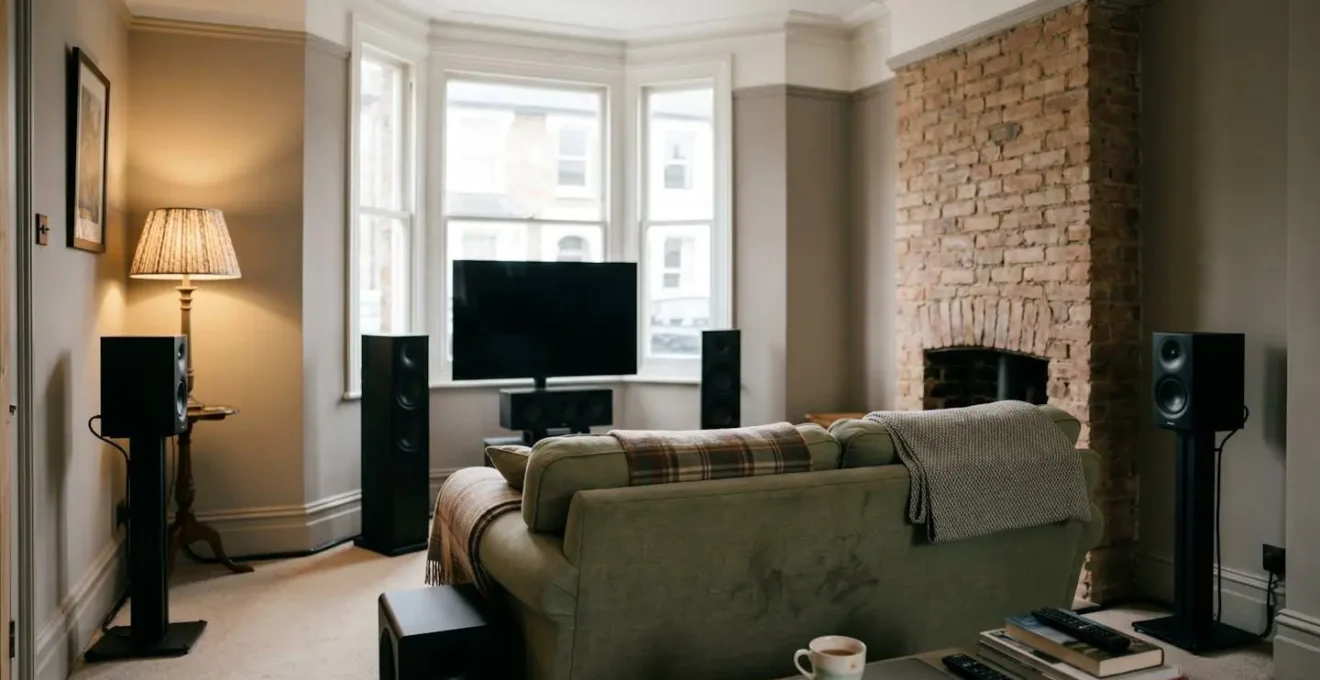
Why Do £300 Speakers Properly Placed Beat £1K Speakers in Wrong Positions?
This principle is the most crucial, budget-saving secret in all of home audio. The room you place your speakers in is the most significant, and most often ignored, component of your entire system. Its size, shape, and furnishings have a greater impact on the final sound quality than the price tag of your speakers. A moderately priced but well-engineered £300 speaker set, placed with care and consideration for acoustics, will sound dramatically better than a £1,000 premium set that has been shoved into corners or crammed into a bookshelf.
Why? Sound interacts with your room in predictable ways. Placing a speaker directly against a wall or in a corner will cause a massive, uncontrolled boost in bass frequencies, resulting in a boomy, muddy sound that obscures detail. This is a common issue in typical UK living rooms with alcoves flanking a fireplace. The instinct is to tuck the speakers neatly into the alcoves, but this is an acoustic disaster. It creates a resonant cavity that ruins the speaker’s intended performance. The premium £1k speaker in this position will sound just as bad, if not worse, than the £300 one, as its higher resolution will simply make the acoustic flaws more obvious.
The solution is to treat your room as part of the system. The properly placed £300 speaker is pulled away from the wall (even 30cm makes a huge difference), placed on a dedicated stand to position the tweeter at ear level, and angled towards the listening position. This small act of strategic placement allows the speaker to perform as its designers intended, delivering a clear, balanced sound with a defined stereo image. You are hearing the speaker, not the room’s negative influence on it. Before you even think about upgrading your hardware, first maximise the performance of what you already own through placement.
How to Test Whether Your Soundbar Is Downgrading 4K HDR to Standard Range?
While this article focuses on a full 7.1 component system, the underlying principle of signal integrity is universal and applies to any setup, including those involving soundbars with HDMI pass-through. The core question is: “Is the 4K HDR signal from my source device making it all the way to my TV screen without being downgraded?” You can’t rely on your eyes alone; you need to interrogate your equipment to get a definitive answer. This is a simple verification process that can save you from mistakenly thinking you have a faulty component when it’s just a settings or connection issue.
The process involves checking the signal information at multiple points in the chain to see if they all match. You need to become a detective, following the signal from source to screen. The ‘Info’ or ‘Display’ button on your AV receiver and TV remotes is your most powerful tool. When playing a known piece of 4K HDR content (from a UHD Blu-ray or a streaming app), press the ‘Info’ button on your AV receiver remote. Its on-screen display should explicitly state it’s receiving a signal like ‘4K’, ‘2160p’, ‘HDR’, or ‘Dolby Vision’.
If it says ‘1080p’ or ‘SDR’, you’ve found the bottleneck. The problem lies somewhere between your source and the receiver. If the receiver shows the correct 4K HDR input, the next step is to press the ‘Info’ button on your *TV* remote. The TV should report that it is also receiving a 4K HDR signal from the receiver. If the TV shows 1080p, the issue is with the receiver’s output settings or the cable between the receiver and the TV. By cross-referencing these two readouts, you can pinpoint exactly where the signal is being downgraded and take steps to fix it.
Your 5-Point Home Cinema Signal Integrity Audit
- Source Check: Before anything else, go into your source device’s settings (e.g., Sky Q, PS5, Apple TV) and confirm its video output is explicitly set to a 4K HDR or 4K Dolby Vision resolution.
- Cable Inspection: Physically inspect the HDMI cables connecting your source to the receiver and the receiver to the TV. Ensure they are certified as “Premium High Speed” for 4K HDR or “Ultra High Speed” for 4K 120Hz.
- Receiver Input Test: While playing known 4K content, press the ‘Info’ button on your AV receiver’s remote. The on-screen display must confirm it is receiving a 4K (2160p) signal with HDR or Dolby Vision.
- TV Handshake Test: Keeping the content playing, press the ‘Info’ button on your TV’s remote. The TV’s own display banner must also confirm it is receiving and displaying a 2160p HDR signal.
- Content Verification: If you encounter issues, switch to a different 4K source or app (e.g., from a UHD Blu-ray to the built-in Netflix app) to determine if the problem is specific to one piece of content or the entire chain.
Key Takeaways
- Placement Over Price: The position of your speakers in your room has a greater impact on sound quality than their cost. Prioritise getting placement right before considering an upgrade.
- Room as a Component: Treat your room’s acoustics as a critical part of the system. Simple fixes like rugs and curtains can provide more improvement than expensive new hardware.
- Know Your Bottlenecks: Before upgrading, identify what’s truly limiting your system. For most, upgrading budget speakers yields a bigger improvement than replacing a functional, 5-year-old receiver.
How Can Small UK Living Rooms Deliver Cinema-Level Immersion on 4m Walls?
The challenge of setting up a 7.1 system in a typical UK living room, often measuring around 4m x 5m, seems daunting. The Dolby guidelines show speakers spread out in a large, perfectly proportioned room—a far cry from a space that has to accommodate a sofa, a fireplace, and daily life. The secret to achieving immersion in a small space isn’t to perfectly replicate a commercial cinema, but to apply the *principles* of cinema sound within your constraints. This involves a focus on two key areas: creating an appropriate field of view and managing bass response.
Immersion begins with the visual. Your screen needs to fill a significant portion of your field of view. According to home cinema installation standards, the optimal viewing distance for a 65-inch TV is a surprisingly close 1.5 to 2.5 metres. In a 4-metre-long room, this is easily achievable and places you right in the sweet spot. This proximity also means your surround speakers don’t need to be far away to create an enveloping effect. Even if they are just slightly behind and to the sides of your sofa, the short distance enhances their impact.
The biggest challenge in small rooms is bass. Low-frequency sound waves are long and interact with room boundaries in complex ways, creating peaks (boomy spots) and nulls (dead spots). The common mistake is to shove the subwoofer into a corner for convenience, which excites all the room modes and creates an overpowering, muddy boom that travels straight through party walls to your neighbours. The solution is the “subwoofer crawl.” Place the subwoofer temporarily in your main listening position on the sofa, play a bass-heavy track, and crawl around the room’s perimeter, listening for the spot where the bass sounds tightest and most even. This is often along the front wall, but offset from the centre. This strategic placement will give you clean, articulate bass without overwhelming the room or your neighbours, completing the immersive experience.
Now that you are armed with the core principles of placement, power, and connectivity, you have the strategic knowledge to assemble a 7.1 surround sound system that performs exceptionally, without the hefty professional price tag. The final step is to apply this knowledge to your own unique space and equipment, trusting in the process of strategic compromise to build the immersive home cinema you’ve been dreaming of.