Achieving immersive sound in a typical UK living room has less to do with the price of your speakers and more to do with controlling your room’s acoustics.
- Proper speaker placement and basic acoustic treatment consistently outperform more expensive equipment in the wrong positions.
- Digital calibration tools like Audyssey are powerful for fine-tuning, not for fixing fundamental placement or acoustic errors.
Recommendation: Prioritise learning the principles of reflection management and bass decoupling in your space before considering any significant hardware upgrades.
For any UK home cinema enthusiast, the dream is clear: deep, immersive audio that pulls you into the film. The reality, however, is often a typical 4×5 metre living room with solid walls, awkward layouts, and close neighbours. The common advice is to either spend a fortune on high-end speakers or compromise with a convenient soundbar. You might see forums debating £300 versus £1000 speakers, assuming that a higher price tag is the only path to better sound. This approach often leads to frustration—an expensive system that sounds bright, boomy, or just plain flat, failing to deliver that promised cinematic magic.
The core of the problem is that we often forget the most important, and most influential, component in any audio system: the room itself. Sound waves don’t just travel from your speaker to your ear; they bounce off every surface, creating a complex web of reflections, cancellations, and reinforcements that can completely alter the character of the sound. An expensive speaker in an untreated room is like a performance car stuck in a traffic jam—its potential is wasted.
But what if the key wasn’t spending more, but being smarter? What if understanding a few core principles of acoustics and psychoacoustics could transform your existing setup? This guide moves beyond the simple “buy this” recommendations. We’ll explore why strategic placement is more critical than price, how to manage your room’s acoustics without permanent changes, and how to make informed decisions about technologies like Dolby Atmos and tactile bass. By the end, you will have a clear, actionable framework for mastering the physics of your space and achieving a level of immersion you thought was impossible.
This article provides a detailed breakdown of the critical elements that contribute to genuinely immersive audio in a constrained space. The following sections will guide you through the essential principles, from speaker placement to troubleshooting, empowering you to take control of your home cinema experience.
Summary: Creating Immersive Audio in a Compact UK Space
- Why Do £300 Speakers Properly Placed Beat £1K Speakers in Wrong Positions?
- How to Improve Room Acoustics in Rental Properties Without Permanent Changes?
- Real Height Speakers or Virtual Atmos: Which Delivers 3D Audio in Your Room?
- The Loud System That Impresses for 10 Minutes Then Fatigues for Hours
- Should You Add Tactile Bass for Immersion or Keep Peace With Downstairs Neighbours?
- Why Does Audyssey Calibration Improve Sound More Than Speaker Repositioning?
- Why Does Your Picture Cut Out for 2 Seconds Every 20 Minutes of 4K Playback?
- How Can UK Beginners Set Up 7.1 Surround Without £800 Installation Fees?
Why Do £300 Speakers Properly Placed Beat £1K Speakers in Wrong Positions?
The single most impactful—and free—upgrade you can make to your audio system is optimising speaker placement. It’s a concept that enthusiasts hear often, but the underlying science is what truly matters. In a small room, your brain processes a mixture of direct sound from the speaker and reflected sound from the walls, ceiling, and floor. When these reflections arrive too quickly after the direct sound, they cause a phenomenon called comb filtering, smearing audio details and collapsing the stereo image. An expensive speaker with pristine clarity is rendered useless if its sound is immediately corrupted by a nearby wall.
The goal is to maximise the direct sound and control the reflections. Proper placement involves creating an equilateral triangle between the front left and right speakers and your primary listening position. It also means pulling speakers away from walls and corners to delay the arrival of these damaging first reflections. Research consistently shows that the direct-to-reflected sound ratio is the dominant factor in perceived audio quality. Indeed, according to acoustic research on loudspeaker geometry, even small changes in position relative to room boundaries dramatically alter this ratio.
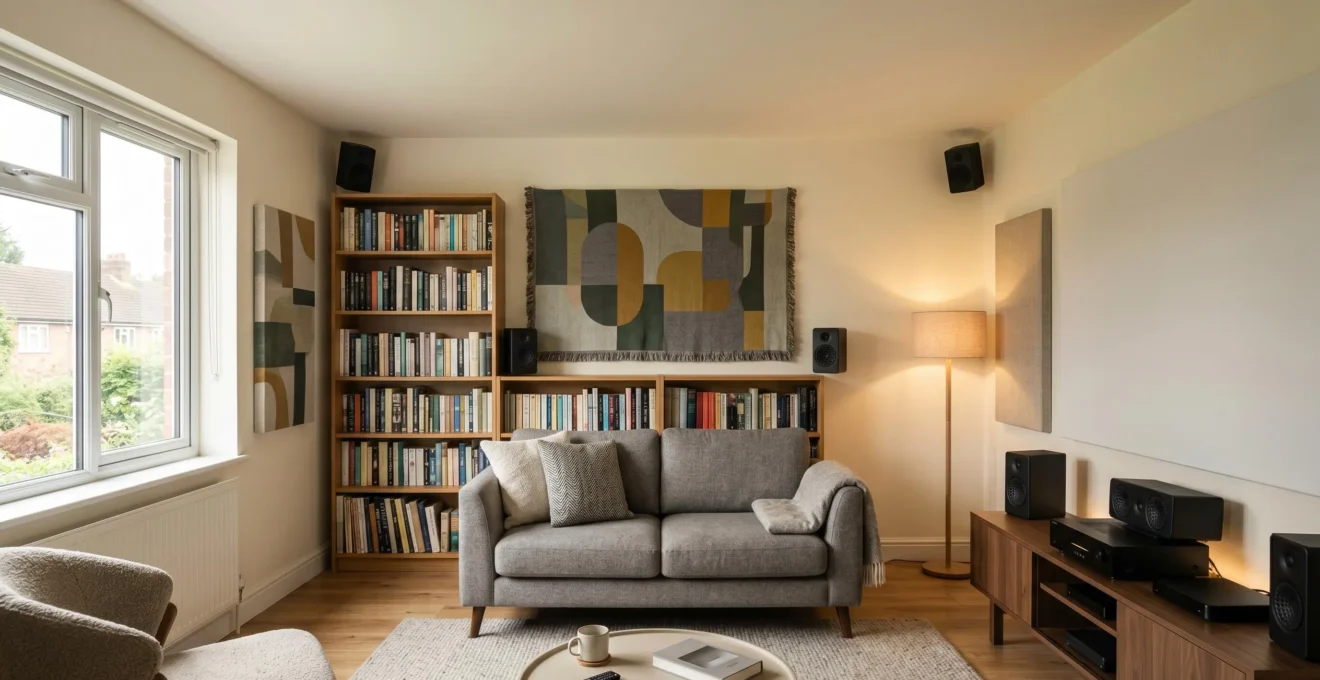
This is why a modest pair of £300 speakers, carefully positioned to minimise early reflections, will deliver a more coherent and immersive soundstage than £1000 speakers pushed up against a wall. Before you even think about upgrading your hardware, you must first address the room. The first step is managing these reflection points.
As this image suggests, the physical properties of materials are key to sound control. By placing absorptive materials at the key first reflection points (the spots on your side walls, ceiling, and floor where a mirror would show you a reflection of your speaker), you can “tame” the room and allow the true quality of your speakers to shine through, regardless of their price tag. This is the foundation of good room acoustics.
How to Improve Room Acoustics in Rental Properties Without Permanent Changes?
Understanding the importance of acoustics is one thing, but applying it in a rental property where drilling holes or permanent modifications are forbidden presents a unique challenge. Fortunately, creating a significant acoustic improvement is entirely possible without leaving a single mark on the walls. The strategy is to use your existing and new furnishings as functional acoustic tools. This approach focuses on two key actions: absorption (soaking up sound energy to reduce reflections) and diffusion (scattering sound energy to prevent harsh echoes without making the room sound “dead”).
Heavy, soft materials are your best friends for absorption. Thick rugs are non-negotiable, as they tackle the critical floor reflection point. On walls, you can use large, thick fabric wall tapestries or even strategically placed canvas art. A well-stocked bookshelf is a surprisingly effective diffuser; its irregular surfaces break up sound waves, adding a sense of spaciousness. Even a plush, fabric sofa placed against a reflective wall can act as a competent bass trap for lower-mid frequencies.
For more targeted treatment, freestanding acoustic panels are an excellent investment. They can be mounted using removable adhesive strips or simply leaned against walls at first reflection points. These solutions are not only effective but also flexible, allowing you to experiment and find what works best for your specific room layout. The key is to think of your room not as a blank box, but as an ecosystem you can shape with moveable, functional pieces.
Action Plan: Non-Permanent Acoustic Treatment for Renters
- Install freestanding acoustic panels at primary reflection points using damage-free adhesive solutions like 3M Command Strips.
- Position full bookshelves against large, flat walls to act as effective diffusers for mid and high-frequency sound waves.
- Place heavy, upholstered sofas and armchairs along shared or highly reflective walls to absorb low-mid frequencies and reduce boominess.
- Hang thick fabric wall tapestries or heavy curtains on walls to absorb high-frequency flutter echo without any permanent fixtures.
- Use large, thick rugs (at least 2×3 metres) on hard floors to absorb floor reflections and reduce ambient noise.
Real Height Speakers or Virtual Atmos: Which Delivers 3D Audio in Your Room?
The arrival of Dolby Atmos brought the promise of a third dimension to home cinema: height. The ideal setup uses discrete, physical speakers mounted in or on the ceiling. However, for many in UK homes, this is impractical. This has led to two main alternatives: up-firing speakers that bounce sound off the ceiling, and Dolby Atmos Height Virtualization, a form of psychoacoustic trickery that uses your existing speakers to simulate height.
Up-firing speakers are highly dependent on your room’s geometry. They require a flat, reflective ceiling at a specific height (typically 2.3m to 3.6m) to work correctly. The common textured Artex ceilings found in many UK properties can ruin this effect, scattering the sound unpredictably. In these scenarios, virtualisation can paradoxically be more effective. The technology uses complex algorithms (known as Head-Related Transfer Functions or HRTFs) to manipulate the sound signal, tricking your brain into perceiving height cues even when the sound is coming from ear-level speakers.
Case Study: The Hybrid Approach for UK Low or Textured Ceilings
For many UK living rooms with low or textured ceilings, Dolby Atmos Height Virtualization can deliver more convincing height effects than poorly implemented physical speakers. Up-firing modules rely on a perfect reflection angle, which is often compromised by ceiling texture or non-ideal room dimensions. Virtualization bypasses this physical limitation entirely. It processes height information psychoacoustically, mimicking how the outer ear naturally colours sound from different elevations. While the effectiveness can vary based on individual ear shape and listening position, it provides a consistent solution where physical reflections would otherwise fail.
So which is better? Physical speakers will always provide a more discrete and accurate effect when implemented correctly. However, the quality of virtualisation has improved dramatically. It’s a compromise, but a very intelligent one. As one user with experience of both noted on a popular forum, it’s a significant step up from standard surround sound. Commenting on Dolby Atmos Height Virtualization, an AVForums user with physical Atmos experience shared their perspective:
I found it was a decent step up from plain 7.1, but nowhere near as good as the real thing. Perhaps 30% or so.
– AVForums user, Dolby Atmos Height Virtualization user comparison thread
The decision comes down to your specific room. If you have the ideal ceiling, up-firing or in-ceiling speakers are superior. If not, high-quality virtualisation offers a more reliable path to 3D audio immersion than a compromised physical setup.
The Loud System That Impresses for 10 Minutes Then Fatigues for Hours
In the world of home cinema, there’s a common trap: equating “loud” with “good.” A system that can shake the walls with explosive bass and piercing highs might seem impressive during a short demo clip. However, this type of sound profile often leads to a phenomenon known as listener fatigue. After 20 or 30 minutes of a full-length film, you might find yourself feeling irritable, developing a headache, or simply wanting to turn the volume down. This is your brain’s defense mechanism against aggressive, distorted audio.
Fatigue is typically caused by high levels of distortion, particularly in the mid-range and treble frequencies where our ears are most sensitive. When an amplifier is pushed beyond its limits or paired with overly “bright” speakers, it introduces unwanted harmonics and harshness into the signal. This isn’t the detailed sound the movie’s engineers intended; it’s noise. Your brain works overtime trying to process this unnatural information, leading to mental exhaustion.
A truly immersive, high-quality system is one that is balanced and clean. It can be played at a satisfyingly loud reference level for an entire movie without ever becoming harsh or uncomfortable. The goal is not sheer volume, but clarity and control across the entire frequency spectrum. This is why investing in speakers and an AV receiver known for low distortion (measured as Total Harmonic Distortion or THD) is far more important for long-term enjoyment than simply buying the most powerful system available. A system you can enjoy for hours on end will always provide a more profound cinematic experience than one that only impresses for a few minutes.
Should You Add Tactile Bass for Immersion or Keep Peace With Downstairs Neighbours?
Deep, powerful bass is essential for cinematic immersion. It’s the physical sensation of an explosion or the rumble of an engine that connects you to the on-screen action. However, in a flat or terraced house, this low-frequency energy is also the primary cause of neighbourly disputes. This is because low-frequency sound waves travel easily through structures, becoming structure-borne vibration that your neighbour experiences as an annoying, inescapable thudding. The challenge is to get the immersion without the intrusion.
The solution lies in two complementary strategies: vibrational decoupling and tactile bass. Decoupling involves physically isolating your subwoofer from the floor. This is achieved by placing it on a specialist isolation platform, typically made of dense foam or spring-loaded materials. This platform absorbs the vibrational energy, preventing it from transferring into the building’s structure while allowing the airborne sound waves—the bass you actually hear—to fill the room. It’s a remarkably effective way to reduce noise transmission to neighbours.
To take this a step further, you can add tactile transducers, also known as bass shakers. These devices are mounted directly to your seating and translate low-frequency signals into physical vibrations. You *feel* the bass in your seat without having to generate massive, room-shaking sound pressure levels. A combination of a well-isolated subwoofer set to a moderate volume and a tactile transducer provides the best of both worlds: you get the powerful, physical impact of deep bass while keeping the peace. It transforms bass from a public nuisance into a personal, immersive experience.
Why Does Audyssey Calibration Improve Sound More Than Speaker Repositioning?
This title poses a common misconception. Audyssey, and other room correction systems like YPAO or Dirac Live, do not improve sound *more* than speaker repositioning. Rather, they are designed to work in tandem with it, correcting the problems that physical placement alone cannot solve. Thinking of it as an either/or choice is a fundamental mistake; the correct approach is “placement first, then calibration.”
Speaker placement primarily deals with the spatial and temporal domains of sound—ensuring the sound from each speaker reaches you at the correct time and minimising the early reflections that smear the audio image. It sets the foundation for a coherent soundstage. However, even in a perfectly placed system, the room itself will still impose its character on the sound in the frequency domain. Every room has “room modes”—specific frequencies that are unnaturally boosted or cancelled out due to the room’s dimensions. This is what causes boomy, one-note bass or a “hole” in the mid-range.
This is where Audyssey excels. Using a calibration microphone, it measures the sound at your listening position, identifies these peaks and dips in the frequency response, and creates a custom digital filter (EQ) inside your AV receiver to counteract them. It electronically smooths out the boomy bass and fills in the gaps, resulting in a much more balanced and accurate sound. It cannot, however, fix a soundstage that is smeared by poor placement or a surround effect that is arriving from the wrong direction. Audyssey is the precision tool you use after the heavy lifting of placement is done.
Why Does Your Picture Cut Out for 2 Seconds Every 20 Minutes of 4K Playback?
There are few things more immersion-breaking than your 4K HDR picture suddenly going black for two seconds, only to return as if nothing happened. This frustratingly common issue is almost always an “HDMI handshake” failure. The handshake is a digital conversation where your source device (like a Blu-ray player or games console), your AV receiver, and your TV negotiate a secure, compatible connection using a protocol called HDCP (High-bandwidth Digital Content Protection). When this conversation is interrupted, the picture drops.
The primary culprit is often a lack of signal integrity. A 4K HDR signal requires a massive amount of data—at least 18Gbps. An older, low-quality, or overly long HDMI cable may not have the bandwidth to carry this signal reliably, causing periodic data dropouts that force a new handshake. According to guidance from professional integrators at CEDIA, cables in poor condition or uncertified hardware are a leading cause of intermittent signal failures. The first and most important troubleshooting step is to ensure you are using a “Certified Premium High Speed” or “Ultra High Speed” HDMI cable.
If a new cable doesn’t solve the problem, the issue may lie in firmware bugs or conflicts between devices. Following a logical troubleshooting hierarchy is the most effective way to diagnose and resolve these handshake failures without randomly changing settings. The process involves systematically eliminating each potential point of failure, from the physical cable to the software on your devices.
- First, replace all cables in the chain with new Certified Premium High Speed (for 18Gbps) or Ultra High Speed (for 48Gbps) HDMI cables.
- Power cycle the entire system in the correct order: Turn everything off, then turn on the TV first, wait 10 seconds, turn on the AV receiver, wait 10 seconds, and finally turn on the source device.
- Check for and install the latest firmware updates for your TV, AV receiver, and source device, as these often contain patches for HDCP bugs.
- Temporarily disable features like CEC (Consumer Electronics Control) and eARC in your device settings to rule out control-related conflicts.
- Ensure the specific HDMI input you are using on your TV has its “Enhanced Mode” or equivalent setting enabled to accept a full-bandwidth 4K signal.
- As a final resort, an HDMI signal stabiliser or “HDMI Doctor” can be placed in the chain to clean and regenerate the signal before it reaches the display.
Key Takeaways
- The acoustic properties of your room and the placement of your speakers have a greater impact on sound quality than the price of the equipment.
- Temporary, non-damaging acoustic treatments like thick rugs, bookshelves, and freestanding panels can be highly effective in rental properties.
- A clean, balanced, and low-distortion audio system provides a more immersive and enjoyable experience over the long term than a system that is simply loud.
How Can UK Beginners Set Up 7.1 Surround Without £800 Installation Fees?
Having understood the core principles—placement over price, the role of acoustics, and the function of calibration—you are now fully equipped to set up your own immersive 7.1 surround sound system, saving hundreds of pounds in professional installation fees. The process may seem daunting, but by breaking it down into a logical, step-by-step plan, it becomes a manageable and rewarding weekend project. The key is methodical preparation and execution.
This isn’t about rushing to plug things in. It’s about taking the time to do each stage correctly, from mapping out speaker positions based on Dolby guidelines to running and tidying cables neatly. Investing in a few simple tools like a wire stripper and some banana plugs will make the connection process far easier and more reliable than using bare wire. The final, and most crucial, step is running your AV receiver’s automated calibration routine. With your speakers now correctly placed, this tool can work its magic on the frequency response, truly unifying the system.
By following a structured plan, you can achieve a result that is not only sonically excellent but also gives you the satisfaction of having built it yourself. This hands-on process also deepens your understanding of your own system, making future tweaks and upgrades far less intimidating. Here is a practical timeline for a DIY 7.1 installation:
- Day 1, Morning (2-3 hours): Unbox all your equipment. Use masking tape to mark the ideal speaker positions on the floor, using a tape measure to ensure your front speakers form an equilateral triangle with the listening position and your surrounds are at the correct 110-120 degree angles.
- Day 1, Afternoon (3-4 hours): Run your speaker wire. For a clean look, run it along skirting boards or tuck it under the edges of carpets. Measure and cut each length of 14-gauge wire, leaving about 10% extra slack for flexibility.
- Day 1, Evening (1 hour): Attach banana plugs to the ends of each speaker cable. This ensures a secure, reliable connection to your AV receiver’s colour-coded terminals and prevents stray wire strands from causing short circuits.
- Day 2, Morning (1-2 hours): Connect all speakers to the AV receiver, carefully matching the cables to the correct terminals. Place the calibration microphone at head-height in your primary listening seat and run the receiver’s automated setup (e.g., Audyssey, YPAO).
- Day 2, Afternoon (1 hour): Use adhesive cable clips or trunking to secure and tidy all wiring. Run a channel check using your receiver’s built-in test tones to confirm every speaker is working correctly, then sit back and enjoy your first film.
Start today by taking the first step: measure your room, assess your current speaker placement, and identify one acoustic issue you can solve this week. Your journey to true cinematic immersion has begun.